How can we help?

Thank you! Your submission has been received!
Oops! Something went wrong while submitting the form.
How to Add AI Avatar Video Narration to Your Demo
How to Manage Screens in Your Demo
How to View and Export Demo Sessions in Demoboost
How to Use Lead and Account Analytics in Demoboost
How to Use Asset Analytics in Demoboost
How to Get Started with the Demoboost API
How to Adjust Screen Scaling in Your Demo
How to Export Your Demo as a Video, PDF, or GIF
How to Use AI Translate
How to Use Demo Archive
Offline Demo Sharing
How to Set Up Global Webhooks in Demoboost?
How to Add Organization Tags
Situation Slide
How to Build a Dynamic Playlist
What can I manage as an Organization Admin?
How to Integrate Demoboost Lead Forms with Webhooks via Zapier?
How to Build and Customize Your Lead Form
How to Share and Embed Demos from a Specific Screen
Great Demo add-on
How to Create and Use Folders
How to Use Demoboost AI assistant for screen editing
How to Editing Screen Elements
How to Create and Apply Custom Theme in Demoboost
How to Add Tour Navigation to your Demo
How to Add Video Screens
How to Add Image Screens
How to Add Voiceover
How to Add Floating Button
How to Use AI refine in your guides
Comprehensive Technical Troubleshooting Guide (Before Contacting Support)
Unable to Capture Locally Hosted Pages
Internal Linking vs. External Linking
Shared Link Not Opening ("You Don't Have Access..." Error)
Images Captured with Incorrect Size or Aspect Ratio
Demoboost Application Not Loading
Captured HTML Elements Are Missing or Broken
Unable to Save Screens in the Editor
Why Can't I Select or Edit a Disabled Element in the Editor?
Why Can't I Add an Image or Video Screen to an Empty Demo?
Unable to Log In to Demoboost
Why Do I Need to Refresh My Page After Installing the Extension?
Variables
Autoplay
Sales Room
Demo playlist
Ending/CTA screen
Pick Your Own Journey Screen
Performing key operations on screen
Integrating Marketo with Demoboost: A Step by Step Guide
Integrating 6sense with Demoboost: A Step by Step Guide
How to Build a Sandbox Demo Using Sandbox Capture Mode or Global Linking
“Great Demo!” Training for Sales Teams
Sample Article
How to Replace images
How to Assign a Variable
How to Select or Create an Overlay
How to download the extension?
How to present Mailchimp to Tim Cook
How to Clear Your Browser Cache
How to Install Microsoft Clarity on Your Demos Using Google Tag Manager
How to Translate Screens
Troubleshooting Saving Errors
How to Capture Local Web Pages
Advanced Guide Cutomisation
How to Edit Elements Behind Overlays
How to Export Data from Demoboost
Analytics Overview
Playback Settings
Live Demo Settings
Demo Email Notifications
How to Share Demos
How to Embed Demos on Your Website
How to Share With Presenters and Channel Partners
How to Duplicate Demos
Inspector Introduction
Creating Mobile App Demos
How to Add Speaker Notes
How to Add Video Narration
How to Add and Manage Guides in Your Demo
How to Link Screens
How to Capture Screens
How to Create Demos
How to Add Extension
Product updates
If this editor looks unfamiliar, you're likely using the previous version.
Access the right documentation by clicking on the button.

How to Manage Screens in Your Demo

Demoboost lets you organize and manage demo screens individually or in bulk, making it easy to update screen order, duplicate content, and reuse screens across demos.

Step 1: Access Screen Actions

Open your demo's Details page, where you'll find all your screens displayed in their current order.

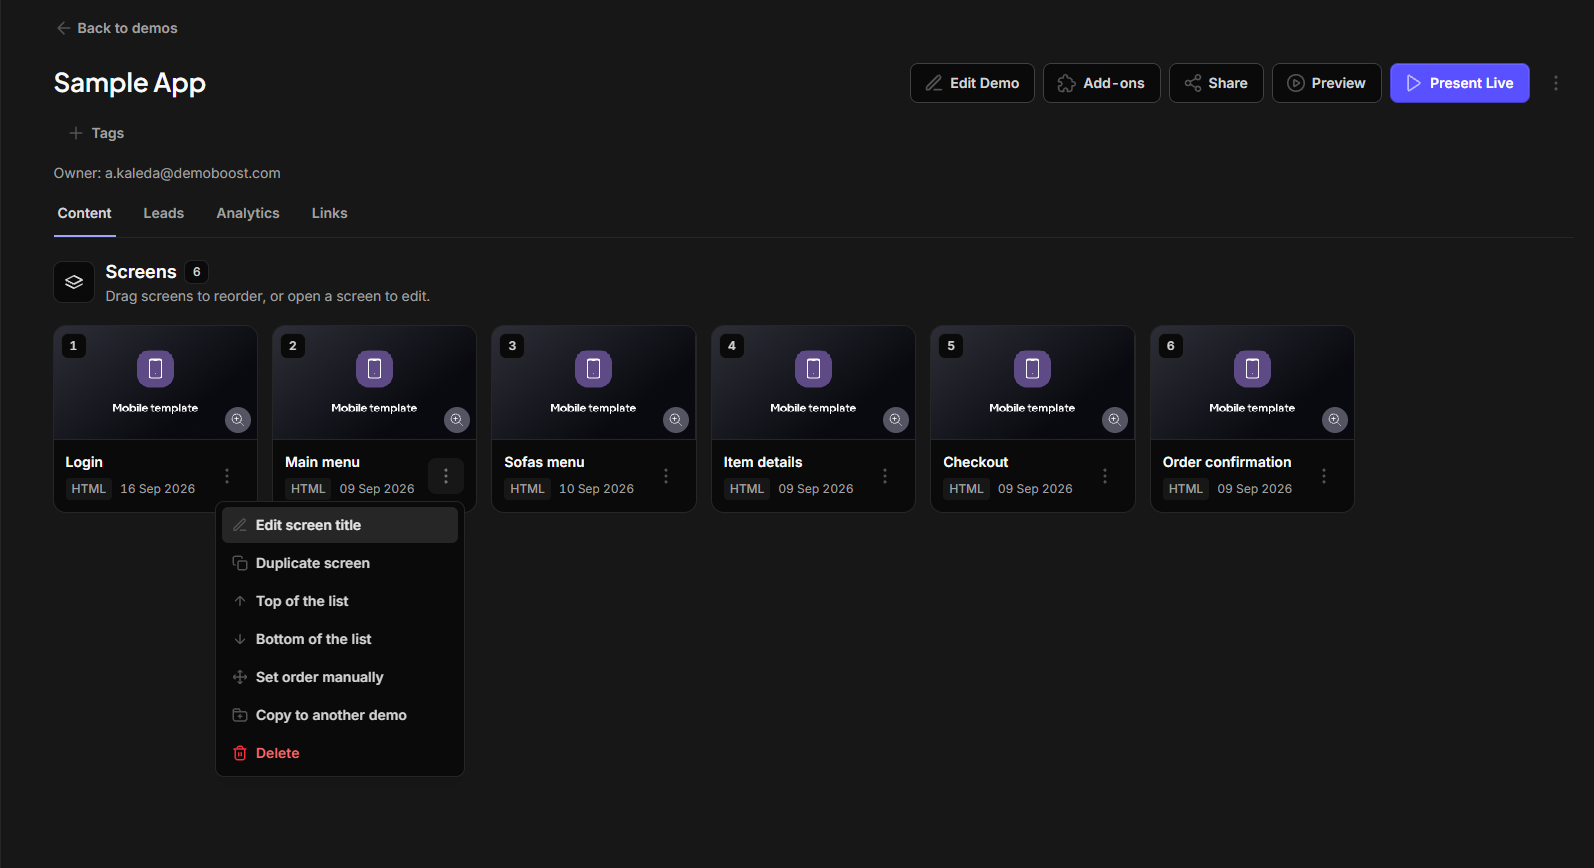
To manage an individual screen, click the three-dot menu on its card to access the available actions.
Step 2: Manage Individual Screens

The three-dot menu gives you access to the following actions:

  1. Edit Screen Title: Rename the screen to make it easier to identify.
  2. Duplicate Screen: Create a copy of the selected screen within the same demo.
  3. Top of the List: Move the screen to the beginning of the demo.
  4. Bottom of the List: Move the screen to the end of the demo.
  5. Set Order Manually: Specify the screen's position in the demo.
  6. Copy to Another Demo: Reuse the screen in a different demo.
  7. Delete: Remove the screen from your demo.

You can also drag and drop screens to change their order directly.

Step 3: Perform Bulk Screen Actions

To manage multiple screens at once, select the screens you want to update using the checkboxes on their cards.
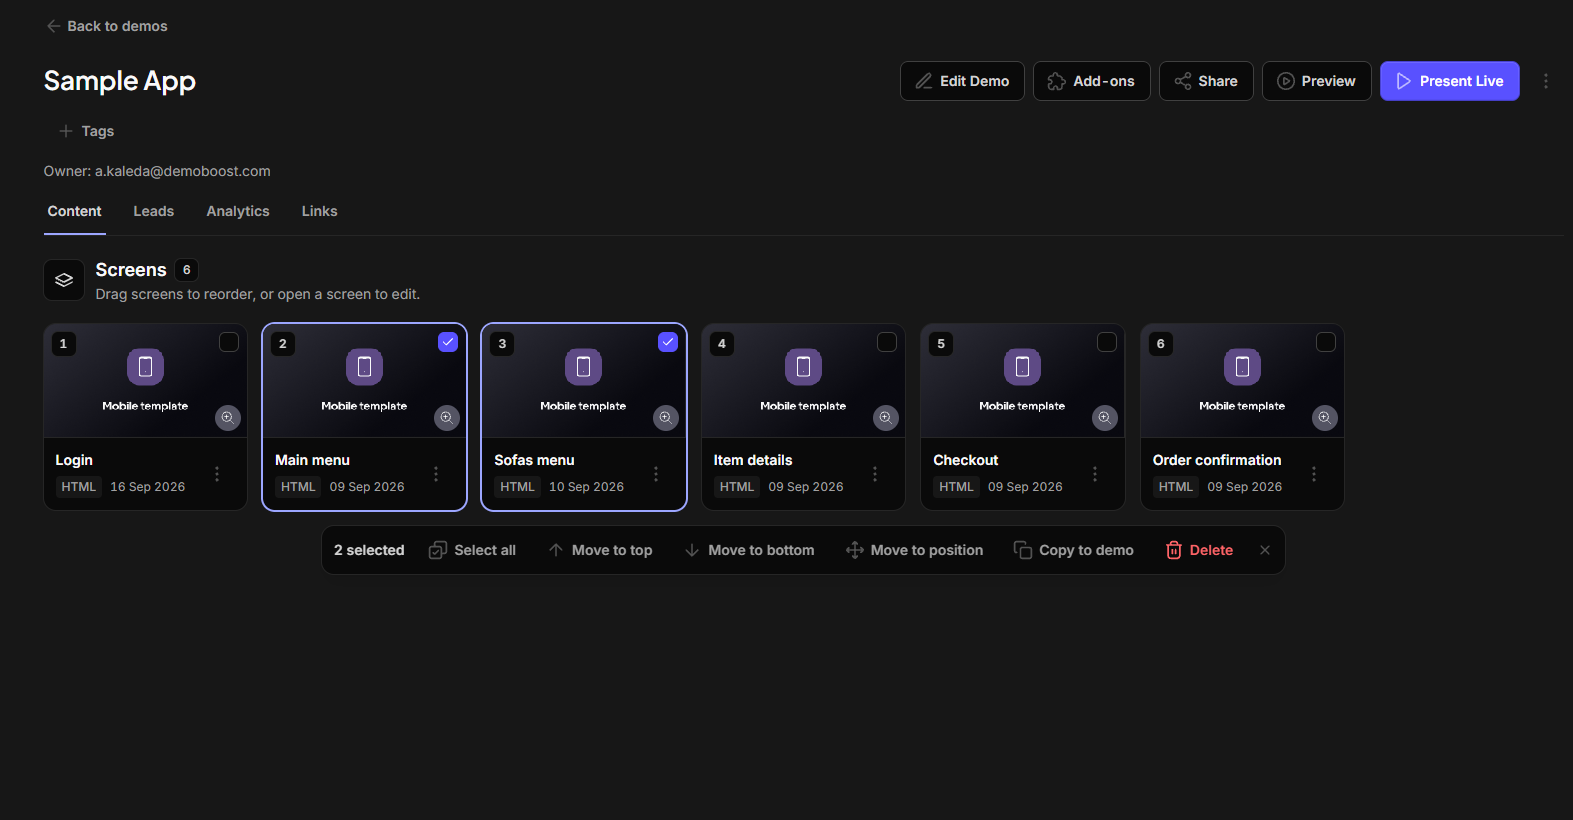
A bulk action toolbar will appear below the selected screens.

From here, you can:

  1. Select All: Select every screen in your demo.
  2. Move to Top: Move the selected screens to the beginning of the demo.
  3. Move to Bottom: Move the selected screens to the end of the demo.
  4. Move to Position: Set a specific position for the selected screens.
  5. Copy to Demo: Copy the selected screens to another demo.
  6. Delete: Remove the selected screens.

Bulk actions make it easier to reorganize larger demos or reuse multiple screens without repeating the same action individually.

Note: Some actions, such as renaming or duplicating a screen, are available only through the individual screen menu.